Monday, July 25, 2011

Things are starting to get nautical.

My husband and colleagues know I'm trending towards the nautical look these days--you know, reds and blues, rope belts, anchors, answering the phone with an ahoy. Just kidding on that last one. While my trend has been more on the fashion front, my ideas for this look really stemmed from basement inspiration. What now?


More on this striped goodness in a bit...

Last fall we bought a red couch. Photo taken in basement in dead of winter, hence awful lighting and coloring.
And with the bead board running along the bottom half of the room already painted in a cream color, I thought, why not add in some navy blue? And the nautical scheming took off.

I really want to tear down the awful wallpaper and get some fresh paint on the walls, but I know that's a multi-day project and I just don't have the nerve to start, plus, the basement was our cool sanctuary during the heat wave last week and I'd rather it not be in chaos mode.

So to start, I made curtains. Technically we already had curtains that I made last Fall when my mode was "something funky that goes with a red couch", and now I don't care for them so much.

At least that cord to the outside has been removed and the hole caulked in.

Besides already having these curtains, I've delayed making something that would cover our side door that is at the landing of our basement steps, so I started there. And because I had something very specific in mind--white and blue striped curtains--I started to wonder how I could get exactly what I wanted. Could I paint my curtains? A quick search on Pinterest showed me that yes, it was doable.

So after sewing up some panels out of leftover canvas, I measured them out and determined my stripes would be 3 1/2 inches wide. I used masking tape to mark the stripes--the spacing looks off here, but you have to take into account the width of the tape itself.


Then I simply started painting. I liked the idea of blue on top to draw the eyes upwards. I found a thick foam brush worked best to really coat the paint on and soak into the thick canvas material.


I used soft fabric paint by Tulip. The instructions recommended washing my fabric before painting (to help prevent stiffness) and to let set for 72 hours before washing again, which shouldn't be an issue since I won't be washing curtains as much as I would had I painted clothing. I found that it wasn't too crunchy when dry. Success!

Until this happened.
I was nearly done painting the second curtain when a drop of paint sprung from my brush and landed in a spot reserved to remain white. Noooo!!! Exactly what I feared happening only moments before.

And then it got worse.

Another smudge. On the other curtain. :( I bumped into the curtain while it was drying. Then I tried to wash it out. It didn't go so well as you can see.

Project fail.

I was determined not to give up. So I brought in some forces. Well, they worked to block the color, but when I hung my new curtains the next day the big painted white smear stood out like a sore thumb. I guess I couldn't even bring myself to photograph them, so they are still hanging while I determine what to do. Cut off the bottom part and sew a new strip on the bottom? Paint the rest of the bottom in blue? Do nothing for several weeks? By default, I have chosen the latter.


But remember, this was only the curtain for the door. I still had two windows to cover in the basement, so when I was back near JoAnn's with a coupon in hand (which is often, just ask my husband), I snatched up more white fabric. I went for something heavy weight, but not as thick as canvas.

And I started where I failed last time. I decided that to avoid paint in places where it should not be, I needed to tape across the entire white portion, which also helped with measuring (which I hate, so it was a win-win).

I painted just as I had with the last set of curtains. I chose to remove the tape as soon as I was finished painting and it seemed to be just fine.

Hey! No blue smudges on the white spots! Win!

Mmm...nautical. I just can't get enough! Here's hoping this will bring me summery cheer in the cold winter months. Except I tend to avoid the sans-heat basement in the winter. Never mind.

Nonetheless, I love my curtains. Now I just have to find the energy for one more set. And to rectify the other set. Ah, maybe next week. Or month.


Thursday, July 21, 2011

Heat wave

The past few days have been unbearable with temperatures rising into the nineties and dew points well above average. I never really needed to know what "feels like 116 degrees" was, but now I do.

Since late Saturday afternoon we've been pretty much hunkered down in our basement. Thank goodness it's finished! The heat made me pretty lethargic. The thought of projects crossed my mind, but by the time I'd leave my office in the AC, my brain would melt and those ideas went right out the window. Projects=planning enough no-cook or grilled meals, keeping ourselves cool, and getting the puppy out as much as possible.

Needless to say, I really missed being able to go outside. This pretty much sums up the lack of outside time:

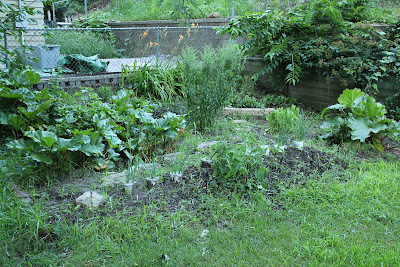
Lots of rain + intense heat = I won't be asked to teach any master gardener classes anytime soon!

The intense humidity broke today and cooled things off to a nice 90 some degrees MINUS the dew point business. So I celebrated by donning my gloves and tackling this beast that used to resemble a garden.

Now, I won't go so far as to call this an after shot--it's more of an in-progress shot--but I'd already pulled for nearly an hour and filled an entire bag with weeds. Until next time!


See? It's not just a bed of weeds! I'm certain the tall stalks in the middle are weeds. I let them grow to test and see what they would become. For this? The Romaine is pretty much crying out to be harvested, that mess of a plant flopping over in the front is my tomato that I failed to put in a cage, and the onions probably would have done better had I removed those yogurt containers. Like I said, no invitation to the master gardener's series. Next year I'll focus on the garden....right...

But for now, I'm pretty excited to end the 4-night streak of sleeping on an air mattress in the basement. I have missed my bed. And I will not miss being jumped on and licked by a dog in the morning. She's cute, but not that cute.


Thursday, July 14, 2011

Colony green and gallery walls!

When we moved into our house nearly a year ago (time flies!), all of the walls were white or antique white, with the exception of the yellow on top, green on bottom kitchen that I love and won't change anytime soon.

We were okay with the white walls. It meant no painting before we moved in (it was in the upper 80s then--no thanks) and we were starting with a clean slate. No wacky former owner's color palate in here!

But after a while--11 months to be exact--it got to me. And this summer I have been tackling many, many projects around the house and it's really starting to feel like our home. One project I keep seeing over and over is a gallery wall, and I knew our large wall in the living room would be perfect for one. But if I was going to hang a gallery wall, I'd have the paint the walls first...

Here was our starting point. These photos were too small for such a large wall. Fun fact: there used to be a doorway to the right center of the wall that led to the kitchen. The previous owners filled it in, but if we look closely, we can still see the outline.


How's this for my project patience? I had to go to the store for paint samples, tape them up, and see them in daylight and evening light. I narrowed in on a green tone right away. Of course, it's none of the ones shown in these samples.

And then I snuck off to purchase my Dutch Boy Refresh (no VOC) flat paint tinted to Colony Green--all while Louis was out to a Saturday morning meeting. Oh boy, was he excited when I came home with all the supplies.

Pretty sure he said, "Wow. You're actually going to do this."

Yup! Now, Louis had never painted walls before, and just the night before was reminding my of my level of patience. He urged me to consider that it wouldn't get done quickly. But I knew better. I painted my bedroom walls (poorly) when I was 12. I knew this could be done in a few hours!

As I got to work taping and painting trim, I even convinced him to start rolling. I taught him the W technique and forgot to take pictures, which is a shame, because I learned that Louis paints in his kitchen apron. :)

And a mere three hours later, we were done! And I mean completely done. It probably helped that it was 80+ degrees in the house (and I realize the irony of not wanting to paint in hot weather last summer) and it dried quickly. So by late Saturday afternoon, we were sitting back admiring our work.

Which meant that Saturday night allowed me to complete my framing and spray painting all of my frames to either white or black to get ready for the gallery wall.

So on Sunday morning, I laid out all of my photos on the floor...


I had measured the wall, subtracted the width of my layout that I liked, divided my two sides of the non-framed portion in half and taped out those boundaries on the floor with painter's tape. You can see one of my corners in the top right of this photo. I also made the same tape mark measurements directly on the wall.

I then laid out and taped together four strips of wax paper. After flipping all of my frames over, I laid the paper on top, traced an outline of my frames, and marked with a sharpie the locations of the hangers.


And with Louis' assistance, I hung the wax paper directly on the wall using my tape pieces as guide for the exact placement. The traces around my frames are hard to see because I had to use a thin-point sharpie that didn't work as well over the waxy paper.

And I hammered my nails directly into the paper.

And then I hung! The wax paper method worked so well--I only had to redo one photo to get my exact spacing right. I wish the this method was my idea, but credit belongs to this genius blogger.

Ah, not only a gallery wall, but colony green walls to boot! This is a pretty true-to-life color, though it reads a little on the yellow side. All of this was complete in a matter of 24 hours! (I showed Louis!)


Now, for what's in the gallery wall:

Clockwise from the top left corner: all of the frames with a yellow arrow are cards from a MN artist with some of our favorite spots from around MN. These were a part of the original layout.
-Top middle is a heart/map project. More on that below.
-A photo of Lilly's first bath!
-A photo I took of the Mill City Ruins in February.
-Bottom middle is our wedding vows. More on that below, too.
-Our first family photo with Lilly.
-A canoe letterpress from my friend, Elana, owner and mastermind behind Fontlove studio!
-And in the very center is a topography map of St. Paul with the State Fairgrounds in a heart. A lovely wedding present from our friend, Caroline. And bonus: our street is on there, too!

This heart-shaped map project was inspired by this item for sale that I continually see popping up on Pinterest. But I wasn't going to order it from Surry when it looked to simple to recreate.


I chose three cities: St. Paul for Louis' hometown, Davenport for me, and Duluth for the location of our honeymoon. I used my heart-shaped cookie cutter and traced outlines from my free rest stop maps. :) I backed them with two pieces of cardstock and framed. So simple. And it's one of my favorite pieces in the gallery.

Another project I've been working on for the last year (in several iterations) finally resulted in this, inspired via this.

The wedding canoers "taking the plunge" is a print from the Kenspeckle Letterpress. We came upon their studio in Duluth, but it was closed. Making a mental note to look up their prints for sale when we got back home, we were pleased to stumble upon this greeting card at the co-op in town. It was perfect (esp. since we had taken a canoe trip on our honeymoon a day before)! So, along with a printout of our vows and our favorite wedding photo, this project was finally complete.

And that's it. From plain white walls to gallery and green in a day! It just seems to take longer to blog about the projects that it does to do them...