Sunday, September 25, 2011

400 cookies

The house project scene has been quiet around HoHub. The minute I set down the last tool for the mini mudroom, I turned my attention to a different sort of project: baking--baking 400 wedding cookies, to be specific.

Way back in March, when I brought some St. Patrick's Day cookies in to the office, my colleague Peggy asked if I would make cookies for her wedding. I obliged. Okay, it was more like, "OMG. Really? Yes I would love to!" and then later realizing that meant A LOT of cookies.

I've never made 400 of anything in my life, so it was quite an undertaking. Knowing the time it would take to make, roll out, bake, then ice the cookies was overwhelming. I'm a planner. I like things to be done on time. But cookies need to be fresh, so I had to figure out a way to work ahead as much as possible.

First things first, stocking up on ingredients!
Thank goodness for DawnMarie and her Costco membership! I did have to pick up a few more items, but that bag of 10X powdered sugar saved having to buy several smaller bags. (Note to self: get DMV to take me back to Costco when it's time for Christmas cookies.)
In total:
  • 8 batches of cookies
  • 6 lbs (or 24 sticks) of butter
  • 40 cups of flour
  • 16 cups of sugar
  • 36 eggs
(and vanilla, baking soda, etc. with less impressive figures to report)

Did I mention I was out of town the two weekends preceding the wedding? Yep, so that meant lots of pre-planning and prep. I rolled out two batches over Labor Day weekend and a few later that week. I layered them between sheets of wax paper and stuck 'em in the freezer until earlier this week.

Cookies won over the freezer!

I took Thursday and Friday off work and spent several hours baking up the frozen batches (the recipe worked great and needed only an extra 2 minutes or so than usual). Earlier in the week I had rolled out two more batches and baked them up fresh since I knew it was too close to the deadline to freeze them. While the frozen ones were baking, I rolled out two more batches! I was still over 100 cookies shy of my target goal of 400 (plus extras in case of breakage, icing flubs, etc.). (Another note to self: two cookie sheets is not enough.)

Is there anything more delectable than a stack of cookies?
By Thursday evening, this was where I left off. Much further behind than I wanted to be!

Friday morning brought dueling KitchenAids. I borrowed my in-laws so I could make multiple batches of royal icing at a time. Somehow it still took me three hours to get it all done!

Thanks to the KitchenAids for sparing my arms from stirring.

Three hours for buckets of blue and red goo!

And it was done just in the nick of time because DawnMarie, my decorating diva, was here to help! She flooded those cookies like a champ!

This is when the first signs of "piping bag hand cramp" were setting in. Totally a real thing. I bet I could even diagnose it on the Internet.

When DMV left, I still had piles and piles of cookies to go. I put my head down and powered through and by the time Louis was home from work, I only had two containers to go! (I know, right? Only two containers was giving me motivation.)

Lucky for me, Louis let me put him to work so I didn't have to ice cookies until the wee hours of the morning.

He literally saved me HOURS of work. True love can be found in icing cookies.

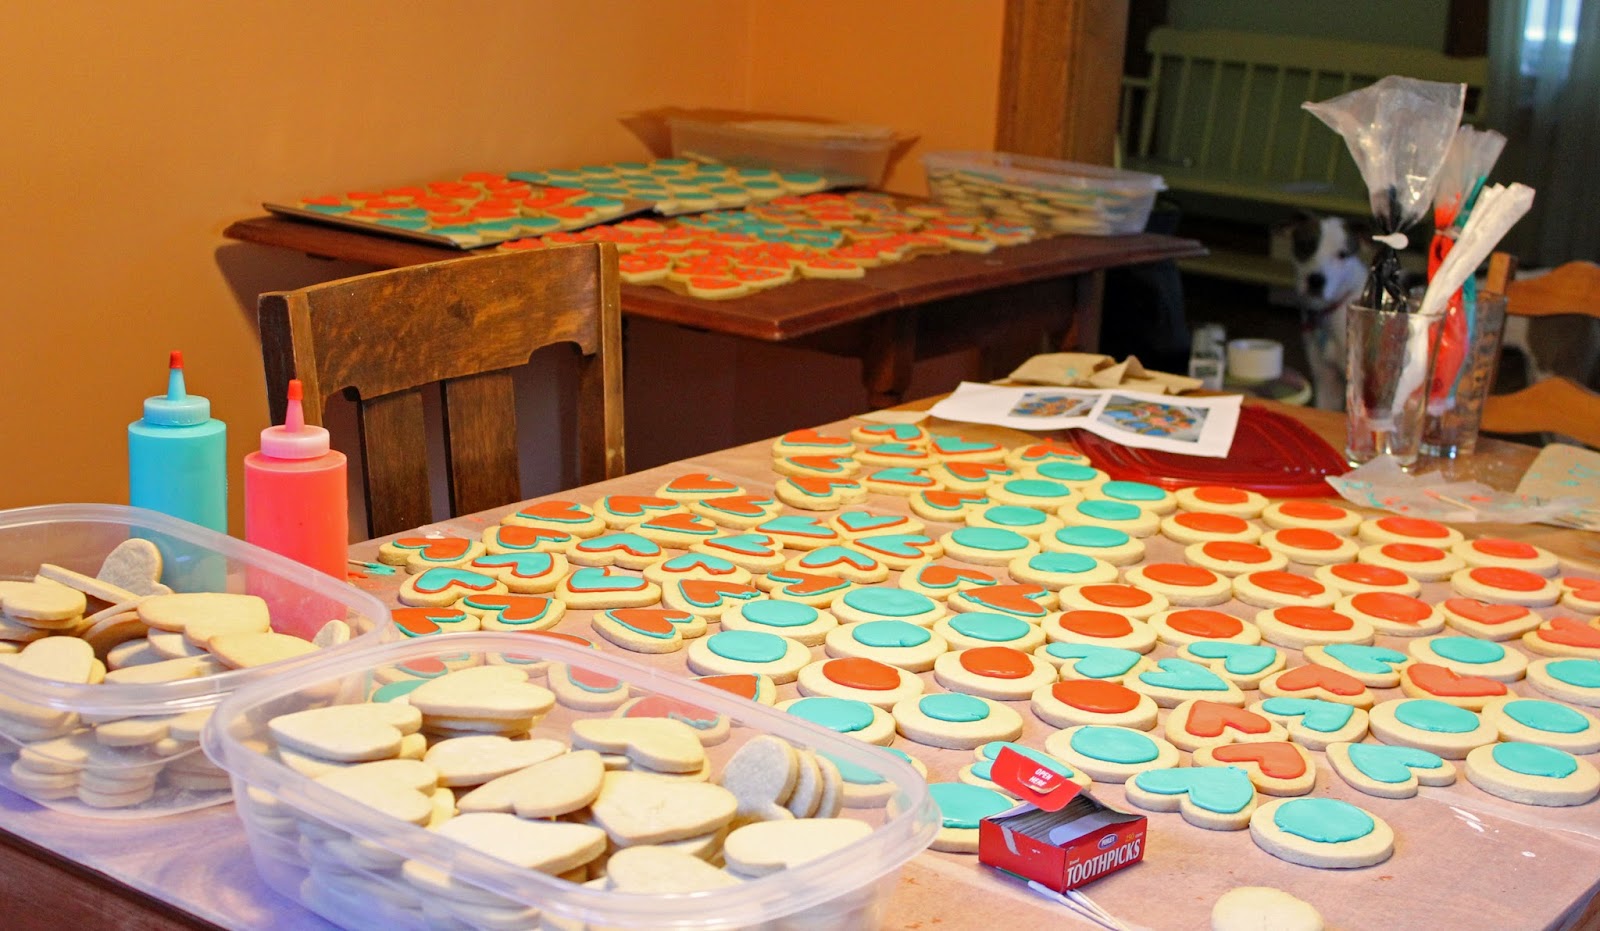
This was the scene of our dining room, aka Hubbard House Bakery!

Every last cookie was iced by 10:30pm on Friday night--whew! Which left me to pack them up and get them ready for transport. Louis helped me deliver and set them up, too.

The wedding had a picnic theme, so I was happy to stumble across these large baskets. I bought a yard of teal gingham fabric to line the baskets. I was happy to see nearly all of the cookies fit.


 With a few spilling over to a turquoise tray I picked up just in case (and I'm glad I did!).


Whew! Did it! Number of cookies broken in transport: two. Not bad! I am relieved to have this all under my belt now.

Louis snapped this photo after the dessert had been served. I hope many more cookies were consumed late into the night!


I've already been asked if I'll ever make cookies again. Please, people, what kind of a question is that? I have a lot of leftover icing and I'm already thinking about whipping some up. And I love cookies too much to never bake them again--just not in quantities of 400. :)

It was a very fun experience and I'm glad I had the chance to do it. Happy wedding, Peggy and Tim! May you always have cookies.

Sunday, September 4, 2011

Making the Mudroom, Part Two

When I last left off, the new mini mudroom was getting the Tart Margarita wall treatment.

On day four of the project (Tuesday, if you're keeping track), it was time to tackle the floor issue. We had determined (after finding scary insulation and foam under the floor board) to instead build up the floor to the same height as the molding. I researched a variety of options, then Louis and I headed out to the gigantic hardware store on a date. (Tools as gifts and dates to the hardware store--does it get any better?!).

I found myself very challenged and stressed by the multitude of options, yet none that seemed to work for us. Plus I didn't want to spend a fortune on a tiny section of flooring. So I settled on some wood pieces (after a lot of difficult math and planning in the store).

I came home and cut them down to size with my baby hacksaw.


And wedged them in place. We figured it was okay to leave a gap in the middle because a solid piece was going on top (and would save me from having to cut a sliver of wood with that tiny saw!).


 Original board back on top...


And with the vinyl piece back in place, I called it a done deal on the floor (even though it's completely unlevel and slopes downward, which I sort of dealt with later on...).


Day five of this project required a trip to IKEA. I haven't intentionally bought anything new from the store into our home mostly because I've been trying to rely on secondhand furniture passed on to us or purchased locally. IKEA pictures are "cookie cutter" to me, but I gave in after seeing the over six-foot tall bookcase in my inspiration photo; it was the exact dimensions needed to fit our space and had adjustable shelving, so it can be customized to what we determine needs to sit on the shelves. And it was available right away (this project was already taking more time than any previous one and I was itching to get it done!).

With the aid of the worst directions in the world, my over six foot tall shelf was assembled and in place! I also moved in a bench/shoe rack my mom gave us a few Christmases ago. It's perfect for this spot!

It's hard to tell from the photos, but the level floor was creating a problem with a very un-level bookcase. To remedy that, I turned back to the saw and cut some pieces from the former shelves. I wedged them under the lower-leaning side of the shelf. I still need to attach the shelf to the wall with a bracket (because I don't trust Lilly to not jump up on those shelves in search of treats when we're not looking!).

With the furniture in, I turned my attention to the walls. In this new space, we not only needed it to be more open, a place to sit and take off/put on shoes, but to also store some of the items from before (namely shoes, dog stuff, broom/mop, and our reusable grocery tote bags).

I found this set of hooks that was perfect for holding the broom and mop--and we could keep them sort of tucked out of sight on the side of the bookcase.

On the opposite wall, I added two framed photos from our recent vacation to Leech Lake: one of a gorgeous evening sunset on the lake, the other of Lilly running along the beach (after she discovered she did like the water!). I also picked up the wall hook at IKEA. I really couldn't pass up the dog butt hook now, could I? :) It's perfect for hanging her leash. Oh, and I finally removed the other bi-fold door!

On Friday, day six of the project, we took a break and went to the FAIR! More on that later...

So on Saturday, one week in, with many details coming together, I turned my attention to the lingering "this is a closet" type details. Like the guide pieces for the bi-fold doors...

With the aid of the cordless drill (one of my most-used and favorite tools), I removed the brackets.

I found pieces of hobby wood at a craft store that were the perfect thickness of the existing board. I measured and cut them to size. I painted them white, but plan to repaint the existing boards with a fresh coat of satin white paint because the smudge marks on them now refuse to wash off!

Again, with the beloved drill, I removed the metal guide piece from the top of the closet.

And found the leftover paint in the basement and touched up the top (and bottom where the brackets had been). Amazing how that little detail made such a big transition. This no longer looked like a closet at all--it's now our little mudroom nook!

With a few more hooks in place and an old window project (because I can't get enough of the old windows)  the mini mudroom is complete!! (More on the window piece later--it's in progress. It would be done if someone had custom-ordered the right size mirrors--doh!)


Oh, mini mudroom, how I love you so! It's only been complete for a day, but it already makes such a huge difference walking in the door. The space feels (and is) so much more open. I love this little part of our house.

And now my favorite part: before and after time!
Cluttered closet of before...


Becomes the mini mudroom after!


Now, if you'll excuse me. I'm going to go sit in my mudroom and take it all in. :)


Saturday, September 3, 2011

Making the Mudroom, Part One

Okay, so it's been a while without any updates from HoHub. I know I haven't posted in a while when my parents point it out to me. It's just that vacation led into a busy time at work, etc, etc. But I'm back and with one of my biggest projects to date to share.

You see, it all began with a broken bi-fold door. One of the doors on our closet in our kitchen got stuck in between our two vacations. As Louis tried to unwedge the door, a piece of the wood on the bottom broke off, pretty much making the door unusable.

And then the closet remained with only one door for the next three weeks. I said to Louis, "We need to get that door fixed."

And he said, "Or we could leave it off?"

Oh, little did he realize I was pining for this moment. I quickly agreed and told him all about my plans to tear the entire closet apart. Yep, that's right. And my wonderful husband agreed.

A little background before I dive right in, though. We enter our house from the back most of the time. The entryway is very narrow. And we live in Minnesota where we wear boots half the year. So after a year of hopping on one foot and standing in the doorway waiting for the other person to hurry up and get their shoes off, I've been dreaming of a bigger entryway. But I didn't see major construction happening anytime soon, so I had to let it go.

Our entry before--with the closet doors closed, there still wasn't much room to move around in the space. (Please note the cute dog in the photo. As it would turn out, she would hardly leave my side during the duration of this project, and it's not because she's a special handydog.)


 This was our closet. I tried to keep it neat, but since we could just pull the doors shut to close out the clutter it never really mattered. As I cleared things out to make way for demo (yes, demo!), I realized this was our dumping grounds. Most of the items in here made sense to live somewhere different.

And the "handydog"? Well, in the middle shelf were her treats. And the bottom shelf her food. And on the top shelf, more treats. She wasn't going anywhere if I was standing in such close proximity to dish out a few treats! (Smart dog. But she didn't get any because I found it highly annoying. Sorry, Lilly!)

Starting to clear things out...
I started in on the project last Saturday. My goal was to pull up that piece of vinyl and see what was underneath the floors. I spent a lot of time thinking about how to level out the floors since you can see the closet is built up and has a ledge separating itself.
 

It started off simple enough. I pulled away the caulk holding the board down. And then got stuck because I couldn't pry up the board. I would need more tools! More specifically: I needed a crowbar. I quit my work for the day and Louis took me and the pup exploring (on a NINE mile urban hike).

He made up for the long walk by buying me my very own crowbar the next day! Aww, tools are the way to my heart!

He proved his prowess by prying the tightly-wedged floor board out for me (I had already admitted defeat. Twice.).

So, um, this is what we found under there (my facial expression says it all). Some Styrofoam blocks, wooden floor, and pink fluffy insulation. So...we shoved that board back on top and made the decision to try to build up the existing closet floor rather than leveling it out with the other floor.


Then me and the crowbar (and some other tools) got to work taking apart the existing shelving. At this point I discovered the multi-colored paint job going on. It seems some of the shelves were added and then the wall was painted. Ick.


Luckily the next step in the process was to patch all of the holes and get some fresh paint on the walls. I could have used some of the leftover kitchen paint the previous owners left, but I sort of wanted this to stand out. I opted for a green-yellow (grellow) paint because our kitchen is green and yellow currently.

Behold: Tart Margarita in Dutch Boy Refresh!
(It makes the other yellow in the kitchen look peach!)


With a few more coats on the wall (and ceiling!) I called it a day (the end of the 3rd day on this project now). Already this was a vast improvement over the cluttered closet! My mini mudroom was beginning to take shape!

I should note that this was my inspiration (found via Pinterest) going into the project. Look at that beautiful organization! (This family apparently only buys things that are lime or pink.)


Continue on to part two to see how the mudroom continued to take shape...